Simple Unit Tests For Android

The time has come to share with you this small article on testing Android app logic. It didn’t occur to me that it is a significant component of Android app development for quite a time but it’s never too late to learn, neither for you, nor for me :)
Overview
First, let’s learn what tests are and why do we need to write them. From Wikipedia:
Unit testing is a software testing method used for testing individual units of source code in order to determine whether they are fit for use.
The idea is to write code for each non-trivial function or method. It allows you to relatively quickly check if the latest change in code causes regression, i. e. new errors appear in the part of the program that was already tested, and makes it easy to identify and eliminate such errors.
Simply put, tests are methods that check the efficiency of your code. But how exactly does it all work? Let’s start from the beginning. Test is considered to be completed if no mistakes were encountered. And for various types of checks we use supplementary methods like assertXXX “family” (see examples below).
There’re 2 types of unit tests in Android:
- Local unit tests which are tests that are performed using JVM only. They are meant for testing business logic that is not interacting with the operating system.
- Instrumented unit tests are tests used for testing logic interconnected with Android API. They are performed on physical device/emulator and thus take more time than local tests
So we have 2 types of tests and choose the relevant one based on the goals of the logic we test. Of course, it’s better to write local tests, if it’s possible.
Also, when creating tests, pay close attention to package organization. The following structure is practical:
app/src/main/java— app source code.app/src/test/java— local tests.app/src/androidTest/java— instrumented tests.
Setup
If for some reasons you aren’t using Android Studio that generates them when you are creating a project, try to memorize the structure above. Furthermore, IDE configures Gradle file of app module:
android {
   ...
   defaultConfig {
       ...
       testInstrumentationRunner "android.support.test.runner.AndroidJUnitRunner"
   }
   ...
}
dependencies {

   testImplementation "junit:junit:4.13.2"
   androidTestImplementation "androidx.test.ext:junit:1.1.5"
}
A popular framework for making test writing process easier is called Mockito. Its features include imitation of objects and overseeing them, as well as supportive tools for conducting checkups. To start using it add a dependency:
testImplementation "org.mockito:mockito-core:5.8.0"
Local Tests In Android
Let’s now take a look at 2 very simple tests that check 2 objects for inconsistencies (2 numbers in our case):
@Test
fun addition_isCorrect() {
   assertEquals(4, 2 + 2)
}


@Test
fun addition_isNotCorrect() {
   assertEquals("Numbers isn't equals!", 5, 2 + 2)
}
To do it create a class in the local test package and put our methods into it. For JUnit to know that these methods are tests they are marked with @Test. assertEquals() method shows you AssertionError when the first (expected) and the second (result) do not correspond to each other.
Let’s run them (by right-clicking the class and choosing Run ‘ExampleUnitTest’ in the menu that appears) to see the output:
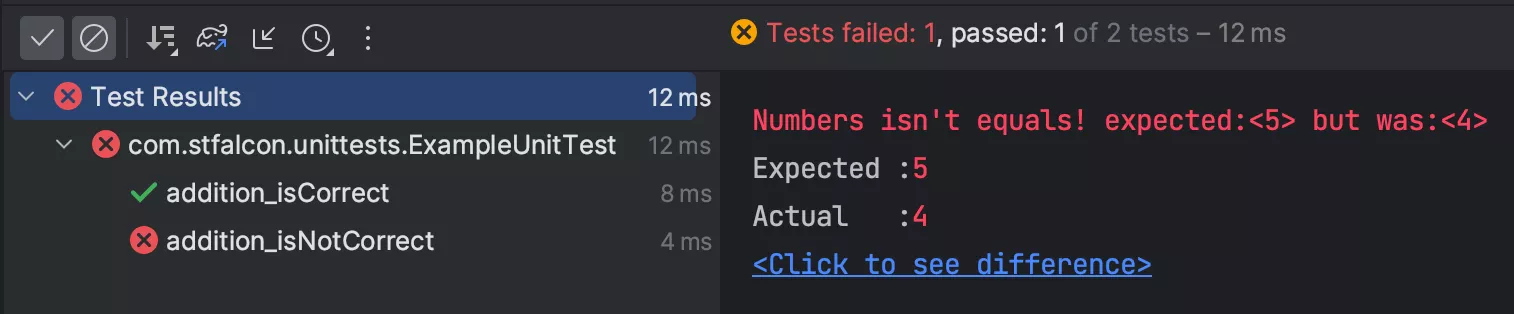
You can see that the first method was executed and the second gets an error since 5 != (2 + 2). You can also set up an expected exception for test using an expected parameter:
@Test(expected = NullPointerException::class)
fun nullStringTest() {
   val str: String? = null
   assertTrue(str!!.isEmpty())
}
In this case the test will be executed since we expected this exception. You can specify timeout parameter for long operations and define the value in milliseconds. The test is considered failed if the method is not executed within the defined period.
@Test(timeout = 10)
fun timeoutTest() { ... }
There’s also a quite interesting Matchers mechanism. For example, assertThat(T actual, Matcher<? super T> matcher) accepts them as input. Methods of org.hamcrest return them. CoreMatchers class and belong to overlap logic operations. Let’s take a look at several of them:
@Test
fun assertTest() {
   val simpleList = 1..10
   val x = 3
   assertThat(x, `is`(3))
   assertThat(x, `is`(not(4)))
   assertThat(simpleList, hasItem(3))
}
As their names suggest, is() can be described as “is equal”, is(not()) as “isn’t equal” and hasItem() as a check for elements availability in the list. And it can be read as a coherent sentence. Here you can find a full list of matchers.
We have seen simple examples so far that can be used for writing simple tests. But I would also like you to take a look at Mockito library that can be used for making our tests superb!
As was mentioned earlier, Mockito is used for creating so called mock objects. Their goal is to replace complex objects that can’t be tested or aren’t suitable for tests. There’re two ways to declare them:
val mockContext: Context = mock(Context::class.java)
or
@Mock
var mockedList: MutableList<String> = mutableListOf()
Note that in order to use @Mock annotation you should mark your class with annotation:
@RunWith(MockitoJUnitRunner::class)
or call out in @Before method next code:
@Before
fun init() {
   MockitoAnnotations.openMocks(this)
}
After receiving mocked object you can do magic! For example, in order to override app name from the string resource you can do the following in @Before method:
`when`(mockContext.getString(R.string.app_name))
   .thenReturn("Fake name")
Now when getString() method is called “Fake string” will be returned :
@Test
fun checkAppName() {
   assertEquals("Fake name", mockContext.getString(R.string.app_name))
   assertNotEquals("My Application", mockContext.getString(R.string.app_name))
}
There’s also a verify() method that will fail the test if the specified method was not called out before that. Let’s take a look at the code:
@Test
fun verifyListFail() {
   mockedList.add("Useless string")
   mockedList.clear()


   verify(mockedList).add("one")
   verify(mockedList).clear()
}
Here’s how it works: we pass our mock list to verify(mockedList) and then specify methods we are interested in. In our case — adding string and clearing the list. An essential tool, I believe :)
But the full potential of this method opens up when you’re using spy objects. The main difference is that, unlike mocks, they aren’t created directly. You might ask: “So what’s the point then?” The point is that by creating a “spy” you can oversee it like a fake object:
@Test
fun verifyList() {
   mockedList.add("one")
   mockedList.clear()


   verify(mockedList).add("one")
   verify(mockedList).clear()
}
Instrumented Tests In Android
Using this type of tests we get access to real context, as well as all the Android API capabilities. Apart from it, there’s a “God mode” we can use for managing the activity life cycle. First of all let’s add the required dependencies:
androidTestImplementation "androidx.test.espresso:espresso-core:3.5.1"
androidTestImplementation "androidx.test:runner:1.5.2"
androidTestImplementation "androidx.test:rules:1.5.0"
For test to be recognized as instrumented, you should mark the class with the respective annotation:
@RunWith(AndroidJUnit4::class)
class ExampleInstrumentedTest {
	...
}
Tests themselves are marked in same way as local tests — with @Test annotation. Let’s check whether the package of our context corresponds to our app using the test method that Android Studio generates by default:
@Test
fun useAppContext() {
   // Context of the app under test.
   val appContext = InstrumentationRegistry.getInstrumentation().targetContext
   assertEquals("com.stfalcon.myapplication", appContext.packageName)
}
Using the available tools you can listen to activities’ status:
@Test
fun lictenLifeCycle() {
   ActivityLifecycleMonitorRegistry.getInstance().addLifecycleCallback { activity, stage ->
       Log.d("TAG", "$activity $stage")
   }
}
You also can check if the view matches the matcher you are interested in or perform actions such as a click, text input etc.
@Test
fun uiRelatedTest() {
   onView(withId(R.id.text)).check(ViewAssertions.matches(ViewMatchers.isDisplayed()))
   onView(withId(R.id.text)).perform(ViewActions.typeText("Hello"))
   onView(withId(R.id.text)).perform(ViewActions.doubleClick())
}
Conclusion
These are probably the most important things I found when familiarizing myself with the topic. Don’t throw stones at me :) But I think that it would be enough for starters. If you want to learn more about junit capabilities, I recommend you to read official documentation and study info on capabilities of the instrumented test.