
Now it's time to make a flexible architecture for Android using DataBinding!
What Is MVVM?
For a start, let's consider the classical description of this template and analyze each of its components. Model-View-ViewModel (ie MVVM) is a template of a client application architecture, proposed by John Gossman as an alternative to MVC and MVP patterns when using Data Binding technology. Its concept is to separate data presentation logic from business logic by moving it into particular class for a clear distinction.
So, what does each of the three parts in the title mean?
- Model is the logic associated with the application data.
- In other words, it is POJO, API processing classes, a database, and so on.
- View is actually a layout of the screen, which houses all the widgets for displaying information.
- ViewModel is an object which describes the behavior of View logic depending on the result of Model work. You can call it a behavior model of View. It can be a rich text formatting as well as a component visibility control logic or condition display, such as loading, error, blank screens, etc. Also, it describes the behavior that was initiated by the user (text input, button pressing, swipe, etc.).
What does it give us as a result?
- Development flexibility. This approach improves the teamwork convenience, because while one member of the team works with the layout and the stylization of the screen, the other, at the same time, describes the logic of the data acquisition and data processing;
- Testing. This structure simplifies test writing and the process of mock objects creating. Also, in most cases it eliminates the need for an automated UI testing since you can wrap ViewModel itself with unit tests;
- Logic separation. Due to the greater differentiation code becomes more flexible and easy to support, not to mention its readability. Each module is responsible for a specific function only.
Since nothing is perfect, there are some drawbacks:
- This approach can not be justified For small projects.
- If the data binding logic is too complex, application debug will be a little harder.
But Still, Who Is Who?
Initially, this pattern needs a little modification on Android. More precisely, it is necessary to revise the components and their habitual perception.
For example, let's consider Activity. It has a layout-file (XML) and associated Java-class, where we describe everything about it work. Does it turn out that the xml-file is a View, and java-class, respectively, the ViewModel? Not quite so. What if I say that our class is a View too? After all, custom view also has xml and handler class, but it is considered to be unified. Moreover, you can live without the xml file in both the activity and the custom view, while creating the necessary widgets in the code. And so it turns out that in our architecture View == Activity (i.e, XML + Java-class).
But what is ViewModel than, and, most importantly, where should we put it? As we could see in one of the sections of the previous article, it is a completely separate object. And that is the thing we passed to a xml-file using binding.setViewModel(). It will have fields and methods, which we need to bind models with View.
Model has no difference from the traditional understanding of it. The only thing that I would like to add from myself — do not make reference to a database or an API directly in the ViewModel. Instead, create Repository for each VM — thus the code will be cleaner and less bulky.
This way we get the following: activity "serves" only the logic that relates directly to the View, but does not apply to its behavior. Such cases may include the installation of add-on Toolbar or TabLayout and Viewpager. It is important that only the View can access the widgets directly by the id (binding.myView.doSomething()), as VM does not need to know a thing about the View — communication between them is implemented only with Binding. The data load and display logic is on the ViewModel, and the algorithm for obtaining the data described respectively in the Model.
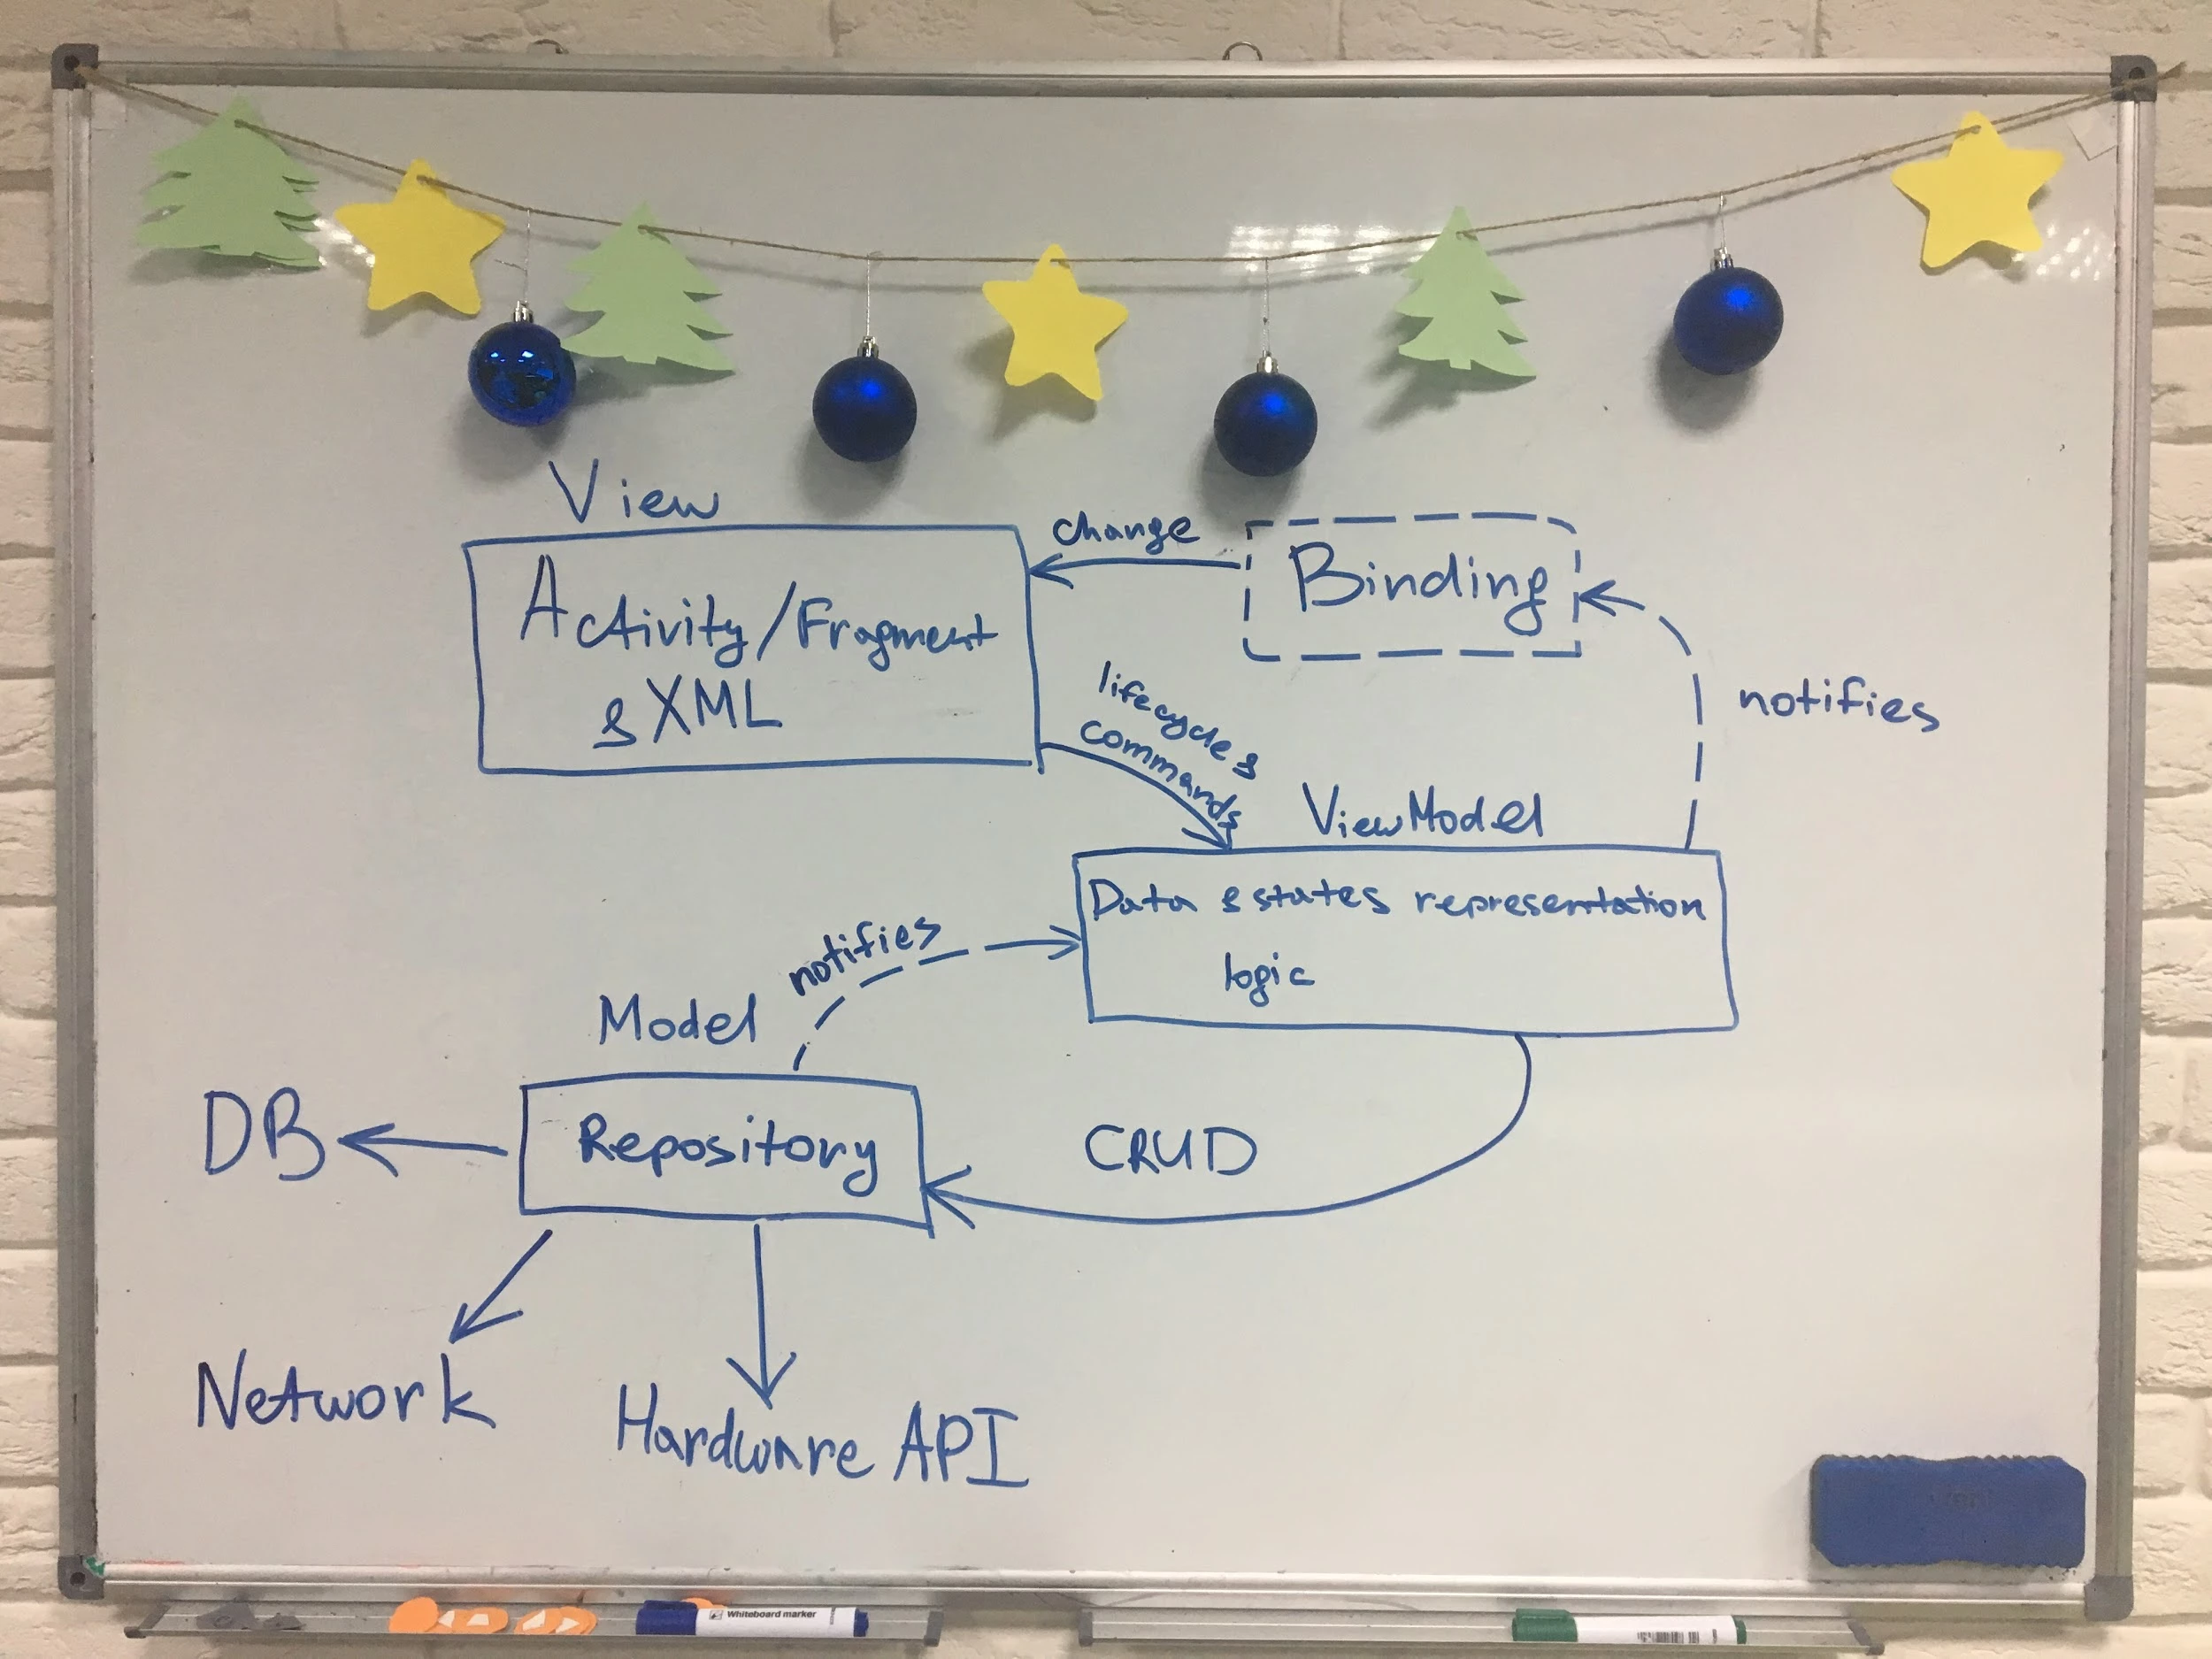
Our designer went on vacation, so scheme will be with elements of New Year's mood :)
Just Do It!
Now directly to the implementation. Looking at the chart above, we can notice that the View sends ViewModel not only commands (user actions), but also its life cycle. Why? Because particularly it is also a kind of action to be initiated by the user. After all, it is because of his actions a screen changes its state. And after that we need to react on a correct application work. The solution suggests by itself: we need to delegate the necessary callbacks to the VM.
Imagine that you need to download the information each time the user returns to the activity. For this, we need to call data download method to onResume().
Let's change ProfileActivity:
private ProfileViewModel viewModel;

@Override
protectedvoid onCreate(Bundle savedInstanceState){super.onCreate(savedInstanceState);
   ActivityProfileBinding binding = DataBindingUtil.setContentView(this, LAYOUT_ACTIVITY);

   viewModel =new ProfileViewModel(this);
   binding.setViewModel(viewModel);}

@Override
protectedvoid onResume(){super.onResume();
   viewModel.onResume();}
...and define the same method in ProfileViewModel:
publicvoid onResume(){
   isLoading.set(this.user.get()==null);
   userRepo.getUser(this::onUserLoaded);}
Now the data will be updated every time a user returns to the window. Besides, if the information hasn't been received before, an appropriate state will appear. Easy :)
We do exactly the same with the rest of the necessary methods. Of course, it's impractical to determine this every time you create a VM, so we'll move this logic to basic classes. We'll name them BindingActivity and ActivityViewModel:
publicabstractclass BindingActivity extends AppCompatActivity {
   …

   @Override
   protectedvoid onStart(){super.onStart();
      viewModel.onStart();}

   @Override
   protectedvoid onActivityResult(int requestCode, int resultCode, Intent data){super.onActivityResult(requestCode, resultCode, data);
      viewModel.onActivityResult(requestCode, resultCode, data);}

   @Override
   protectedvoid onResume(){super.onResume();
      viewModel.onResume();}

   @Override
   publicvoid onBackPressed(){if(!viewModel.onBackKeyPress()){super.onBackPressed();}}//….other methods}

publicabstractclass ActivityViewModel extends BaseObservable {
   …

   publicvoid onStart(){//Override me!}

   publicvoid onActivityResult(int requestCode, int resultCode, Intent data){//Override me!}

   publicvoid onResume(){//Override me!}

   publicvoid onBackPressed(){//Override me!}//….other methods}
Now, as with the Activity default behavior, we just need to override the appropriate method to react on particular changes.
As for me, there is no need to create bindings and VM connection to it each time you create an activity. This logic also can be moved to the basic class, but with a changing onCreate() method. We'll adapt it for VM when creating activity and add a couple of abstract methods for necessary parameters:
private AppCompatActivity binding;private ActivityViewModel viewModel;

publicabstract ActivityViewModel onCreate();publicabstract @IdRes int getVariable();publicabstract @LayoutRes int getLayoutId();

@Override
publicvoid onCreate(Bundle savedInstanceState){super.onCreate(savedInstanceState);
   bind();}

publicvoid bind(){
   binding = DataBindingUtil.setContentView(this, getLayoutId());this.viewModel= viewModel ==null? onCreate(): viewModel;
   binding.setVariable(getVariable(), viewModel);
   binding.executePendingBindings();}
All is left is to make the basic class for ActivityViewModel. Here everything is simpler: just add a copy of the Activity. It is useful to us to create intents and also suitable as a context:
publicabstractclass ActivityViewModel extends BaseObservable {

   protected Activity activity;

   public ActivityViewModel(Activity activity){this.activity= activity;}

   public Activity getActivity(){return activity;}//...lifecycle methods}
That’s all for activities. We have the necessary tools for describing logic, except for one nasty little things. Such fields as «viewModel» and «binding» in the basic activity are explicitly typed, which makes the work with them more complicated, forcing to get types each time. Therefore let’s summarize our classes as follows:
publicabstractclass BindingActivity<b extends viewdatabinding vm activityviewmodel>extends AppCompatActivity {

   private B binding;private VM viewModel;

   public B getBinding(){return binding;}}


publicabstractclass ActivityViewModel<a extends appcompatactivity target="_blank">extends BaseObservable {

   protected A activity;

   public ActivityViewModel(A activity){this.activity= activity;}

   public A getActivity(){return activity;}}</a></b>
Done! After all the magic we've got this activity class:
publicclass ProfileActivity
       extends BindingActivity<activityprofilebinding profileviewmodel>{

   @Override
   public ProfileViewModel onCreate(){returnnew ProfileViewModel(this);}

   @Override
   publicint getVariable(){return BR.viewModel;}

   @Override
   publicint getLayoutResources(){return R.layout.activity_profile;}

}</activityprofilebinding>
getVariable() should return the name of the variable, which is specified in the tag data->variable of activity xml file, and getLayoutId() should return the same xml. It also worth noting that ProfileViewModel should inherit ActivityViewModel.
The implementation of such classes for fragments is slight differences, but we'll not consider it in details in this article, because concept for all of them is similar. Ready-to-go class can be seen below.
Several Useful Examples
Since our last article about DataBinding, this library not only has lost its beta status, but also has acquired some very useful innovations. One of them is the two-way binding. Now data affect UI, and vice versa. For example, when a user enters his name in the EditText, the value of variable is also immediately updates. Earlier we've done a similar feature, but it involved TextWatcher and BindingAdapter. Now, this can be achieved much easier. All you need to do is to change
android:text="@{viewModel.text}" на android:text="@={viewModel.text}" (attention to the equality sign after the "@"). That's all :). But such tricks only work with the Observable fields (ObservableInt, ObservableBoolean, ObservableField etc.). That's how a dialogue, where we've changed the status of Mark, looks now:
<layout xmlns:android="http://schemas.android.com/apk/res/android">

   <data><variable name="viewModel" type="com.stfalcon.androidmvvmexample.features.dialogs.input.InputDialogVM"></variable></data>

   <edittext android:layout_width="match_parent" android:layout_height="wrap_content" android:hint="@string/dialog_status_text" android:text="@={viewModel.text}" android:textcolor="@color/primary_text" android:theme="@style/ThemeOverlay.AppCompat.Dark.ActionBar"></edittext>

</layout>
We added a ViewModel here for view in dialogue, as ObservableField transfering directly to the variable does not work correctly (I don't know, is it a bug or a feature, but it is not obvious for sure). Similarly, you can also bind to other attributes, such as checked in CheckBox and RadioButton, enabled and so forth.
If you need to react or change data during its input/output, you can override the get() and/or set() in the Observable field and make the desired manipulation there.
publicfinal ObservableField<string> field =new ObservableField<string>(){
   @Override
   publicString get(){// TODO: your logicreturnsuper.get();}

   @Override
   publicvoid set(String value){// TODO: your logicsuper.set(value);}};</string></string>
And if the problem is only to track changes, you can add OnPropertyChangedCallback:
field.addOnPropertyChangedCallback(new OnPropertyChangedCallback(){
   @Override
   publicvoid onPropertyChanged(Observable sender, int propertyId){// TODO: your logic}});
Another feature is the ability to use setters as attributes in the markup. Let's suppose we have setAdapter() method at the same RecyclerView. To install it, we need to apply directly to the widget instance and call its methods directly from the code, which is contrary to our approach. To solve this issue, you can create BidningAdapter, or even CustomView, which will expand RecyclerView and you can add your own attributes there. But this is not the best option.
Fortunately, everything is much easier: thanks to code generation we can point setter name in xml while simply omitting the «set». Thus, the adapter can be set like this:
bind:adapter="@{viewModel.adapter}"
The prefix «bind» is the good old «appliaction namespace», and if it has already been announced, it is better to simply duplicate them in order not to confuse the declared custom attributes with the attributes generated by a Binding:
<layout xmlns:android="http://schemas.android.com/apk/res/android" xmlns:app="http://schemas.android.com/apk/res-auto" xmlns:bind="http://schemas.android.com/apk/res-auto">
   ...
   <android.support.v7.widget.recyclerview android:layout_width="match_parent" android:layout_height="match_parent" app:reverselayout="true" bind:adapter="@{viewModel.adapter}"></android.support.v7.widget.recyclerview>

</layout>
Nevertheless, the idea of CustomView has the right to life, if there's no desired setter in the widget (or if it's improperly named).
Maybe, someone of you have wondered how to transmit parameters in the ViewModel with such architecture? Approach to delegation is also here, but for convenience we create a static method open (or openForResult), which lists all the necessary parameters. Then we pull out those parameters and pass them in the ViewModel, which has an appropriate constructor. For example, we will give status to our activity as a parameter:
privatestaticfinalString KEY_STATUS ="STATUS";

publicstaticvoid open(Context context, String status){
   Intent intent =new Intent(context, ProfileActivity.class);
   intent.putExtra(KEY_STATUS, status);
   context.startActivity(intent);}

@Override
public ProfileActivityVM onCreate(){returnnew ProfileActivityVM(this, getIntent().getStringExtra(KEY_STATUS));}
Another little feature that I would like to share is the imposition of the «isLoading» and «isError» fields in the basic class ViewModel. These fields are public and are of the ObservabeBoolean type. Because of this there is no need to duplicate the loading state logic and errors. To respond their changes, you can simply use include:
<include layout="@layout/part_loading_state" bind:visible="@{viewModel.isLoading}"></include>
If necessary, you can move the icons and messages for different cases (for example, the different causes for the error) to individual variables, thereby obtaining a flexible component which is implemented with a pair of rows in any layout.
Forget About Boilerplate!
While using MVVM, we are faced with the fact that we had to write a lot of annoying code: modification of Activity / Fragment under the basic classes, prescribing long names for Binding-classes in the generics, creating and binding of the ViewModel; and at the early stages we had to copy the basic classes from project to project, which also took precious time. That is why we've created a library and a plug-in for Android Studio, with which this routine began to occupy only 2-3 clicks.
AndroidMvvmHelper library is a set of basic classes for convenient work with MVVM. This list includes classes for working with Activity (BindingActivity and ActivityViewModel), and with Fragment (BindingFragment and FragmentViewModel), which already have binding logic, and the necessary methods for callbacks are also defined. In order to start using it you just need to define dependencies in gradle file:
dependencies {
   ...
   compile'com.github.stfalcon:androidmvvmhelper:X.X'}
Although the library solution simplifies developer’s life, the creation of classes is still a quite time-consuming process. To solve this problem, we have developed a plug-in for IntelliJ IDEA and Android Studio — MVVM Generator. It allows one-click creation of BindingActivity class (or BindingFragment), its ViewModel and already prepared marking xml file to register the component in the AndroidManifest (in the case of activity, of course). In addition, if the plugin does not detect dependency of MVVMHelper library, it will be added automatically.
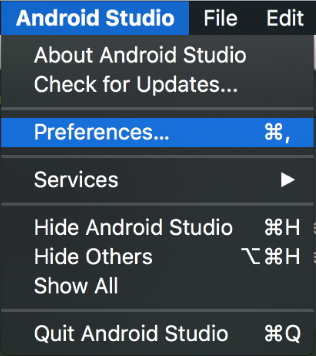
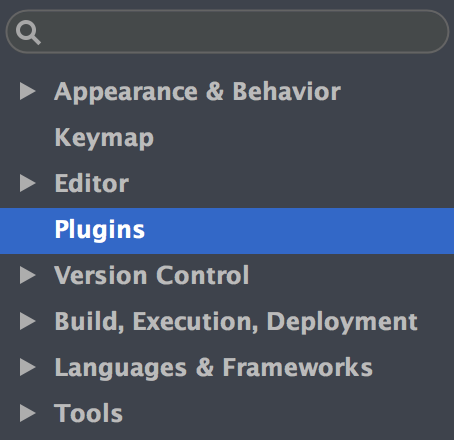
To install it, you need to go to the plugin management section:
 |  |
Click «Browse repositories» to search for available plugins on the web:
![]()
In the search box, enter «MVVM Generator», select plugin and click «Install»:
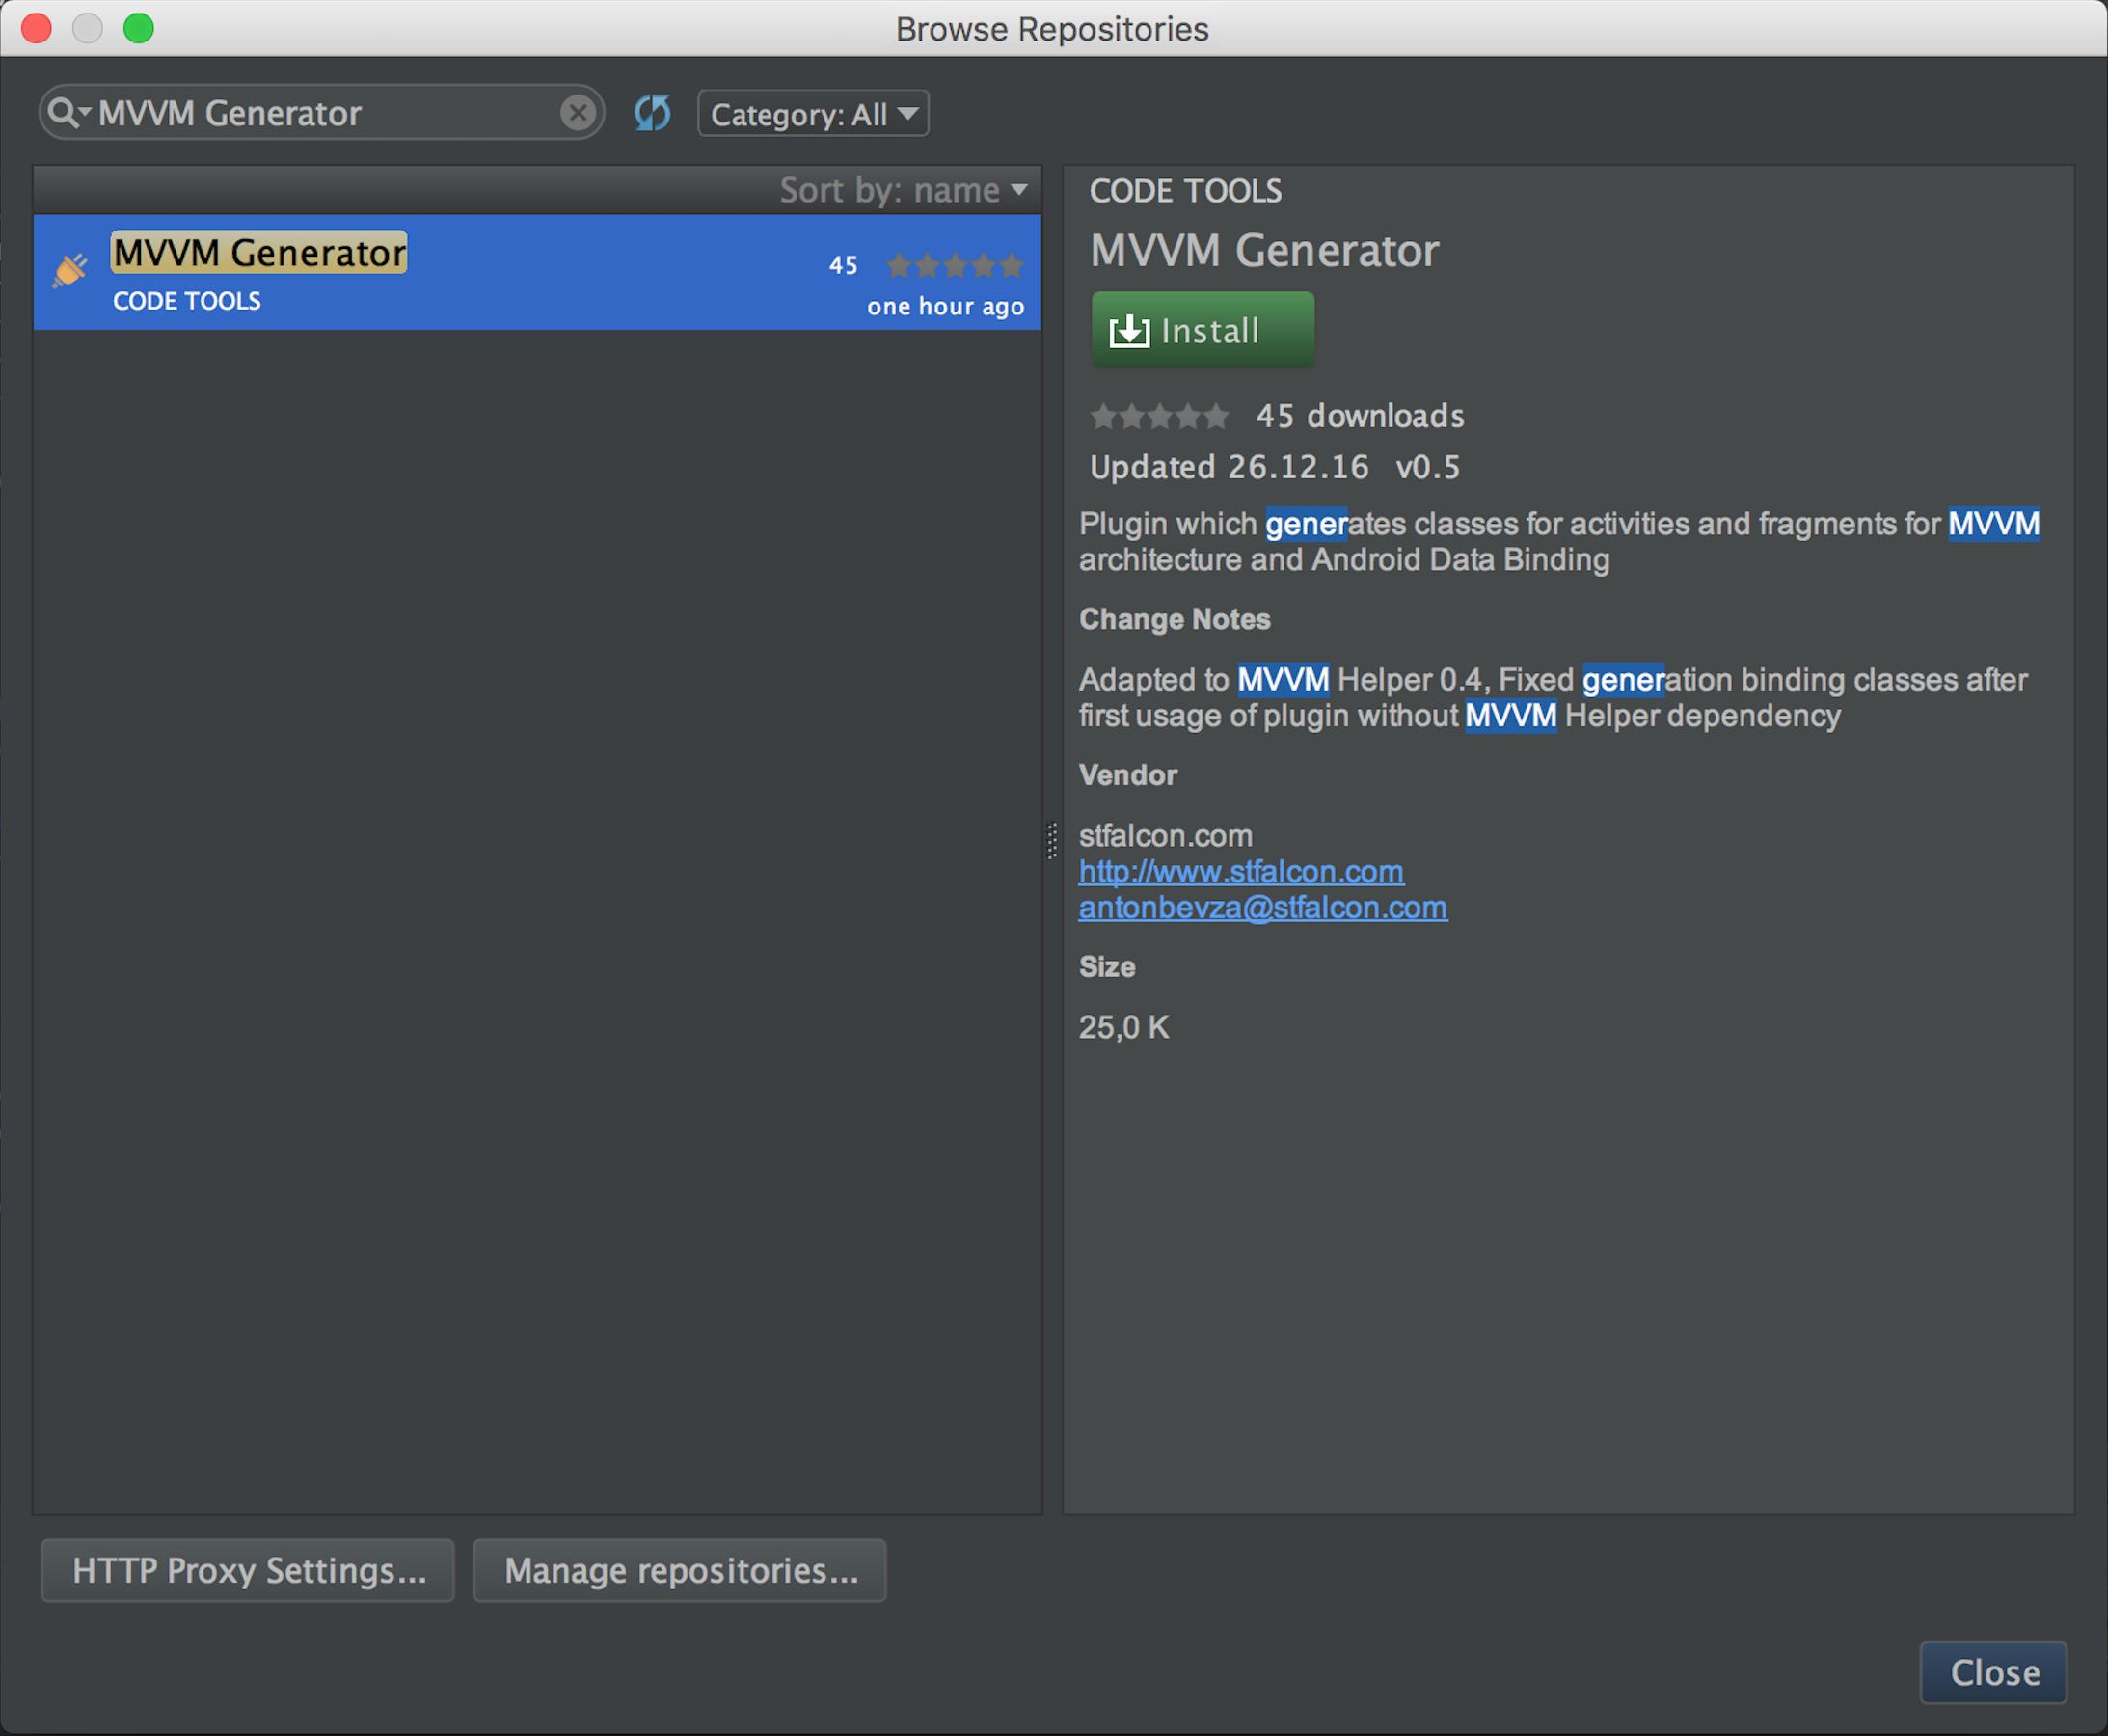
At the end of the installation, you must restart the IDE. After that plugin is ready to use.
Now let’s create a profile fragment. In this case, as when creating a normal class, we’ll call the context menu on the needed package and select «Create Binding Fragment».

Once we enter the track title (in this case, «ProfileFragment»), we obtain the following:

When looking inside, we'll see the ready-to-work classes:
publicclass ProfileFragment
       extends BindingFragment<profilefragmentvm fragmentprofilebinding>{

   public ProfileFragment(){// Required empty public constructor}

   publicstatic ProfileFragment getInstance(){returnnew ProfileFragment();}

   @Override
   protected ProfileFragmentVM onCreateViewModel(FragmentProfileBinding binding){returnnew ProfileFragmentVM(this);}

   @Override
   publicint getVariable(){return BR.viewModel;}

   @Override
   publicint getLayoutId(){return R.layout.fragment_profile;}}

publicclass ProfileFragmentVM
       extends FragmentViewModel<profilefragment>{

   public ProfileFragmentVM(ProfileFragment fragment){super(fragment);}}</profilefragment></profilefragmentvm>
In addition to this we have ready-to-go xml:
<layout xmlns:android="http://schemas.android.com/apk/res/android" xmlns:app="http://schemas.android.com/apk/res-auto" xmlns:tools="http://schemas.android.com/tools">

   <data>

       <variable name="viewModel" type="com.stfalcon.androidmvvmexample.features.profile.ProfileFragmentVM"></variable></data>

   <relativelayout android:layout_width="match_parent" android:layout_height="match_parent">

   </relativelayout>

</layout>
And all this in just a few seconds! So...
Summarizing
Plug-in is very simple and solves only the main task — generating the files. There are plans to add check for the presence of bindings, a more flexible title validation, expanded activity templates configuration and much more, but for now — we have what we have.
Since the release of a stable DataBinding version our team has already implemented several projects using this approach. From my own experience I can only say that I do not want to go back to more traditional methods of writing applications, and when it is necessary to do it — you feel yourself like a man from the future. In general, we’ve got less of routine work, and therefore the development process has become more interesting. Besides, the guys from Google are actively working on an adequate support of this technology in Android Studio, which greatly minimizes discomfort while developing a project. Now it’s the basic approach, which is used by us to create applications.
We hope that our experience will make life easier when creating a MVVM-architecture in your application.
Happy Holidays!
P.S. Updated code sample from the previous article can be viewed here.


